How to pick the Best Bike Light for Mountain Biking
As you well know, mountain biking can be a blast no matter what kind of equipment you have, whether that is a rusty old Walmart bike, or the latest Specialized Turbo Levo. However.... I think we can all agree things get to be a little more fun with the best equipment. Just like with the dozens if not hundreds of different bikes available, there are a lot of different bike lights available too.
We hope this guide will give you a little understanding on what to look for when looking for the best bike light when it comes to Mountain Biking.
We are the experts when it comes to bike lighting, not because we are putting together a list of items, but because we actually design, engineer, and assemble some of the best bike lights on the planet right here in Chicago, IL.
What to consider when choosing a Bike Light
One item you'll see talked about over and over is "more lumens is better", and that is true, to a point. For mountain biking you will want around 900 to 1000 lumens no matter what. Whether that is a helmet mounted light like the Hangover, or a handlebar mounted light like the Trail Evo.

However more lumens is only part of the equation. A great mountain bike light should also have solid battery life that will last the length of your typical bike ride, be durable enough to handle the crashes you'll inevitably have, as well being dust and waterproof since you never know when there might be unexpected rain, or stuck behind someone slow kicking up dust.
Understanding Brightness and Lumens
Understanding the brightness of a bike light is crucial when selecting the ideal option for mountain biking. One of the most common measures of brightness is lumens. Lumens refer to the amount of light emitted by a source. The higher the number of lumens, the brighter the light will be. However, it is important to note that a high number of lumens does not always equate to better visibility.


Battery Life and Charging Options
Battery life can vary a lot between different bike brands. Those with large, heavy external batteries can have fairly long runtimes because they are able to fit 4 to 6 lithium ion cells into the pouches. Then you have to deal with the excess wires and difficulty mounting to your frame. Generally most people are looking for fully self contained lights that have the battery inside like what we provide here at Outbound Lighting.
With self contained lights, it is important to look at battery capacity, and stated runtimes. This can be a challenge though as not everyone rates runtimes the same way. The "FL1 standard" lets manufacturers self rate their lights from 100% output down to 10%, no matter what the curve is. So many will say "2000 lumens for 2 hours" but in reality the average lumen output is more like 800-1000 lumens.
Outbound lights are all rated to exactly what they state. So 100% output will be maintained for the entire stated runtime. This makes their runtimes look "lower" than competitors, but they believe in giving you exactly what you paid for, not fluffed up numbers that don't tell the true story.
Along with runtime, it's important to consider charging time. This is especially important for 24 hour races and endurance races. Most lights are now USB-C chargeable, but not everyone springs for the increased electronic costs that come with USB quick charging 3.0, so just because it is USB-C doesn't mean it is a fast charger.
Some lights now offer pass-through charging as well, which lets you use the light while being charged up. Though as far as we know, the Outbound lights are the only ones that offer pass-through charging in every mode, not just stuck on low like Niterider or Light & Motion.
Mounting your bike light on your bike
This should in theory be a rather simple premise. How to mount your light onto your bike. However there can be some complications.
For one, most mountain bike handlebars are either 31.8mm in diameter or 35.0mm in diameter. So you will want to make sure the light you are getting can be compatible with either diameter. Some companies use over-cam type of mounts which can adjust, some companies have fixed mount solutions specific to that bar size, and others will have shims that will mount to the different sizes. Other handlebar sizes are 22mm (common on Scooters) and 25.4mm bars which is common on titanium handlebars and older bike handlebars.
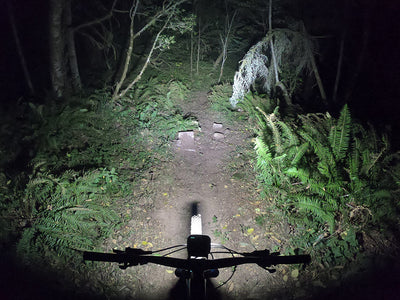
The other consideration is how the mount will position the light. Ideally you want the light to be centered and in front of your bike, much like a car headlight. Most lights on the market are more like flashlights, and require you to mount the light offset to the left or right of your stem. This is prone to creating weird offset shadows, while also just looking goofy.
Trail Evo is mounted front and center, so almost looks like a motorcycle headlight on your mountain bike.
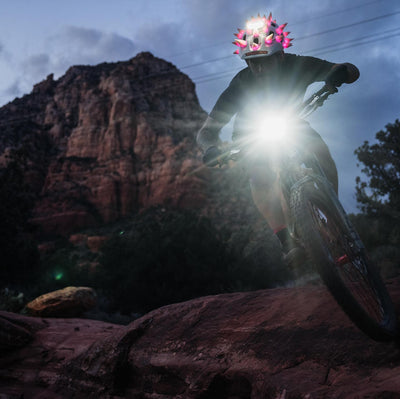
Helmet mounting is another consideration to think about. Most lights will have some sort of action camera adapter, however they tend to raise the light far above your head, making the weight noticeable when you move your head side to side. A great bike helmet light should be low profile, and tucked as close to your helmet as possible, so that you won't feel the weight as much, as well as protecting the light from getting snagged on low lying branches.
Durability and Weather Resistance
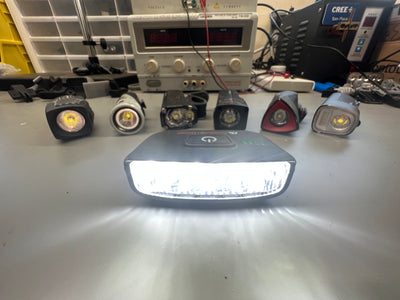
This one is rather self explanatory, when riding mountain bikes, far likely to encounter rain, snow, sleet, mud and dust. Almost every light on the market will be "rated" to be water and dust resistant, but keep in mind almost every company just self-certifies the IP rating. While some cheaper brands just straight up make up a rating. Take a close look at reviews to see if people complain about water getting in their lights, or dust killing them. This is one area kind of have to do your own research to find out.
Conclusions
Picking a mountain bike light is rather simple. Look for a light with a broad beam pattern, with enough lumens, that is solidly mounted front and center (or on your helmet), that is dust and water resistant with a good amount of battery life. In today's world of online advertising, the best bet you'll have is asking your friend groups, or looking up the reviews of different lights to see what common trends are. Well respected companies will have hundreds of reviews to look through, and be easy to spot if fake or not.